Hi,I m the leader of our group-"wonderland",and I have updated the process of creat website in our group blog.
The group blog link: www.langkawi-wonderland.blogspot.com
Have a nice day~ :)
MMBsunshine
2011年9月11日星期日
2011年8月11日星期四
Assignment 1
Hey,welcome to my blog,now I am going to introduce my assignment 1.This is about FOM open day,I have to do something about FOM.
First,I choose 5 pictures to start my work. Thoes are logo of MMU,outer space, and sunbjects of FOM that include Finance,Management,Accounting and so on.


2.Open the 5 pictures,click Files-open... on image of outer space,select all and move to the background,and it is layer 1.
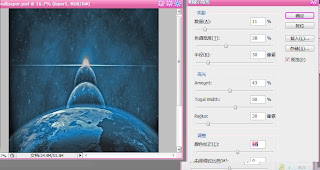
3.Click Image - adjusting-shadow/highlight.Then turn out a block diagram,shadow amount:11%,
Tonal width:37%,highlight amount:43%,Tonal width:50%,colour correction:+6.
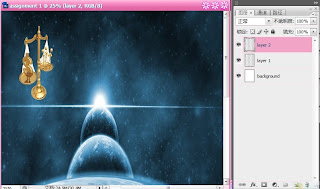 4.On image of Accounting,click Magnetic Lasso Too, lasso a part out what I need, move it to background, and adjusting its size to small.
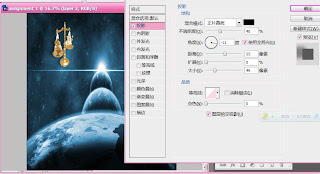 5.Now,I am going to change the layer 2's effect. First,right click the layer 2,choose Layer Blending Options,it will be turn out a layer style.At left side,click Shadow,and change its point of view to -11,click mode,choose color burn, opacity to 40%,distance:55,size:49.
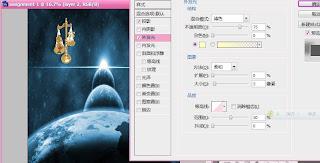
6.Click Outer Glow on the layer style,choose mode:Colour filter,opacity to 75%,
Figure element method:Soft.Its size:5.Range:50%.
7.Click Bevel and Emboss on the layer style,choose type: Inner Bevel, method:Smooth, depth:100%,direction:Up,size:4,shadoe point of view:-5,height:32.And click OK.
The layer's effect is down.
8. On image of management,I use Quick selection tools to select a part of image,and move it to background.Adjusting its size and direction.
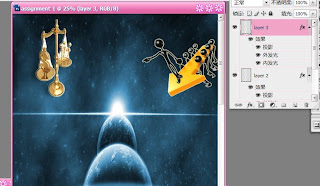 9.Because of the layer 3 is darkness,so I make it a little different.The frist step is same,right click the layer 3,choose Layer Blending Options,at its left side,choose Shadow,Outer Glow,and Inner Glow. The inner glow is to make it clear.In shadow style,change its angle to -162,because the layer 3 locate upper-right side.
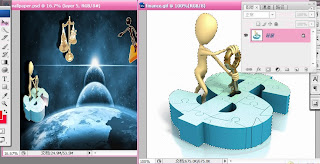 10. On image of finance,I use Quick selection tools to select a part of image,and move it to background.Adjusting its size and direction.
 11. The frist step is same,right click the layer 4,choose Layer Blending Options,at its left side,choose Shadow,Outer Glow,and Gloss.Make the Gloss mode to highlight.Make its angle to 19,distance:11,size:14.
12.On image of MMU logo,move the layer to backgroundk,put it to down-right side.Then right click the layer 5,choose the Layer Blending Options,in Blending Options,make the blend area to gray,and under this layer,put the white arrow to 230,the white part of MMU logo disappear, then click OK.
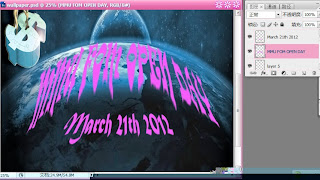
13.Click Text tools,text "MMU FOM OPEN DAY"and"MARCH 21TH 2012"on the earth.Change its colour and typeface.
Those are processes what I have down. This is my assignment 1.Thanks for view~~
2011年6月27日星期一
tutorial 1 - select tools
Those are pictures which I have used.
Step 1 : select 5 pictures.
Step 1 : select 5 pictures.
Step 2: Open adope photoshop cs3, click the file,creat a new layer,and then open the 5 pic,in the first pic,I use quick Select tool to select a building.
Then,adjusting its size.3. put the two MMU logo and one digital cartoon on the layer.
And then,adjusting its size.
2. I need a sign of "faculty of management" and blue sky from the second pic,also use Quick select tools to select it.
Then,adjusting its size.
2011年6月26日星期日
This is me
Hello, welcome to my blog! I m Mayao, you can also call me Linda ^^ ,I come from a city in the west of china which has beautiful natural scenery,I m studying in MMU,taking finance with multimedia course.I have been here for 3 years, I have made many international and malaysian friends, they are so kind and help me a lot.I will remember the learning experience in Malaysia in my life.
订阅:
评论 (Atom)


